Receipt OCR: How to Convert Receipts to Text for Expenses and Bookkeeping
Receipts are the most practical thing most people convert to text. A shoebox of paper receipts becomes a spreadsheet. A photo of a restaurant bill becomes an expense claim. A year's worth of fuel receipts becomes a tax deduction with evidence attached. The use case is obvious, and the documents are small, so it feels like it should be easy. In practice, receipts are among the hardest documents to OCR well, because they are printed on the worst paper, in the smallest type, with the least standard layout of any common document.
This guide explains how receipt OCR works, why receipts are hard, how to photograph a receipt so it reads, and how to turn the extracted text into something your bookkeeping can use. You can try it on the image to text converter on the home page — a receipt photo converts in seconds. For the general method, see how to convert an image to text; for the accuracy techniques, see how to improve OCR accuracy.
Why Receipts Are Hard
Four things make receipts harder than ordinary pages. The first is the paper. Most receipts are printed on thermal paper, which fades with time, heat, and light. A receipt from six months ago may already be pale grey on white, and a receipt left on a car dashboard in summer can fade to near-invisible. Faded text has low contrast, and low contrast is the single biggest cause of OCR failure.
The second is the size. Receipt type is typically 8 to 10 points, smaller than book text, and the numbers — the part you actually need — are often the smallest characters on the page. At phone-photo resolution, a digit on a receipt can be barely a dozen pixels tall, which is near the floor for reliable recognition. This is why receipt accuracy is lower than page accuracy even when the photo is good.
The third is the layout. There is no standard receipt. Some put the total at the bottom right, some in the middle, some on a separate line with a row of asterisks. Some list items with prices on the same line, some wrap the price onto the next line, some use two columns that the OCR reads across instead of down. Every receipt is a new layout puzzle, and layout errors — the total read as a line item, or two columns merged into one line — are more common on receipts than on any other document.
The fourth is the content. Receipts are full of the things OCR reads worst: numbers, abbreviations, and proper names. A line like "2x LATTE GRANDE 9.00" contains a quantity, an abbreviation, a product name, and a price, and the language model cannot correct any of it, because none of it is ordinary prose. A misread digit in a total is also the error with the most consequence: a $12.25 lunch read as $12.85 is a small error that compounds across a year's expenses.
What Receipt OCR Is Good For
Despite the difficulty, receipt OCR is worth doing, because the alternative — typing every receipt by hand — is slower and more error-prone than proofreading an OCR result. The key is to match the tool to the job. For a single expense claim, converting one receipt and checking the total takes a minute. For a month of expenses, converting a batch of fifty receipts and proofreading by confidence takes an afternoon instead of a weekend. For a year's bookkeeping, the OCR text is the starting point for a spreadsheet, not the finished product — you still check the totals, but you do not type every line.
The U.S. Internal Revenue Service requires taxpayers to keep records that support their deductions, and a scanned receipt with its text extracted is a legitimate record — the IRS guidance on recordkeeping (Publication 583) accepts electronic records, including scanned copies, provided they are legible and complete. An OCR text file is not a replacement for the receipt image; keep both. The image is the evidence, the text is what makes it searchable and easy to enter into your books.
How to Photograph a Receipt So It Reads
Receipts are small, curly, and often crumpled, so the photograph needs more care than a page of a book. Flatten the receipt first: put it under a heavy book for a minute, or hold it flat on a table with your fingers at the corners, outside the text area. Thermal paper curls, and a curled receipt photographed at an angle distorts the lines at the edges, which is where the totals usually are.
Photograph it straight down, in bright, even light. Daylight near a window is best; a desk lamp from one side creates a shadow and a bright spot. Fill the frame with the receipt — the text is small, and every pixel counts. If the receipt is long, photograph it in two overlapping sections rather than trying to fit the whole thing in one shot at low resolution. And if the receipt has faded, try increasing the contrast in your phone's photo app before uploading: the "document" or "enhance" mode in most camera apps is designed for exactly this.
Do not photograph a receipt through a plastic sleeve, and do not photograph the back of a receipt through the paper. Both are common mistakes, and both produce unreadable images. Take the receipt out, lay it flat, and photograph the printed side directly.
If the receipt is very faded — pale grey text that you can barely read yourself — OCR will struggle, and no amount of contrast enhancement will fully fix it, because the information is genuinely gone from the paper. In that case, photograph it anyway and convert it, because the result may still capture the total and the date, which are often the darkest print on the page. But treat the result as partial, and type the missing lines by hand while you can still read them.
How to Convert a Receipt to Text
Upload the receipt photo to the converter on the home page. Set the language to match the receipt — English for most receipts in the United States, Spanish or another language where appropriate — and choose TXT as the export format, since you will be copying the text into a spreadsheet or an expense app. If you are archiving the receipt, add searchable PDF as well, so the filed copy keeps the image and the text together.
When the result comes back, check three things in order.
| Field | Where to find it | Why it matters |
|---|---|---|
| Total | Usually the largest number, bottom of the receipt | The amount you claim; the most consequential error |
| Date | Top or bottom, often in small print | Puts the expense in the right month |
| Merchant name | Usually the largest text, at the top | Expense software matches on this |
| Line items | Middle of the receipt | Needed for detailed reports; abbreviations are error-prone |
| Tax | Near the total | Needed for tax records |
First, the total. Find the total on the receipt image, and compare it digit by digit with the total in the text. The total is the number that matters, and it is the number most likely to be wrong. Second, the date. Receipt dates are often printed in a small font at the top or bottom, and a misread date puts the expense in the wrong month. Third, the merchant name, which is usually the largest text on the receipt and usually reads correctly — but check it, because expense software often matches on the merchant name.
The line items are the least critical part for most purposes, and the most error-prone, because they are abbreviations and product codes. If you only need the total, the date, and the merchant, do not spend time fixing every line item. If you need the line items — for a detailed expense report, or to split a bill — proofread them against the image, line by line, and expect to fix a few.
For a batch of receipts, upload them all at once. Starter converts 50 images per batch, Pro converts 200, and the CSV report lists every receipt with its confidence score. Sort by confidence and proofread the lowest-scoring receipts first. A batch of clean, recent receipts will mostly score above 85 percent; the faded ones will score lower, and those are the ones to spend time on.
Turning Receipt Text Into a Spreadsheet
Raw OCR text is not a spreadsheet, and turning it into one takes a little structure. The simplest approach is to copy the total, date, and merchant from each receipt into a spreadsheet with four columns: date, merchant, total, and category. That is enough for most expense claims and for tax records, and it takes about a minute per receipt after the OCR is done.
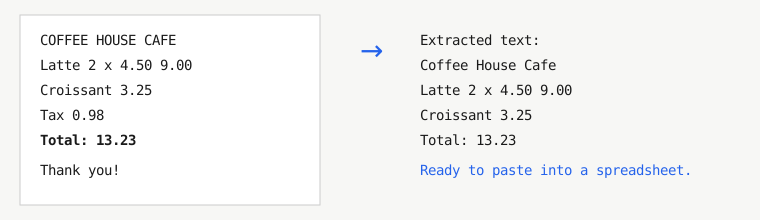
If you need the line items, the text will need more work, because OCR returns lines of text, not a table. A typical receipt line reads something like "Latte 2 x 4.50 9.00", and turning that into columns for item, quantity, unit price, and line total is a manual job, or a job for a spreadsheet formula that splits on the spaces. Do not expect the OCR tool to do this for you: OCR reads characters, it does not understand that "9.00" is a price and "Latte" is a product. That understanding is a separate step, and it is yours.
One practical tip: keep a consistent naming scheme for the text files. "2026-11-08-coffee-house-13-23.txt" tells you the date, the merchant, and the total at a glance, and it makes the folder searchable without opening every file. The ZIP download from SnapText names the files after the original images, so name the photos sensibly before you upload them, and the text files will inherit the names.
Receipt OCR and Privacy
Receipts contain personal information: where you were, when, what you bought, and how much you spent. A stack of receipts is a detailed record of your movements and habits, and the text extracted from them is just as sensitive as the images. Before you upload receipts to any tool, check its privacy policy. SnapText processes files on its own server, never shares them, never uses them to train models, and deletes uploads and results automatically after 72 hours. If a tool cannot say the same in plain words, do not upload your receipts to it.
For business expenses, there is an additional consideration: if you are uploading receipts that belong to your employer or your clients, you are handling someone else's financial information, and you should use a tool your organization trusts. The same 72-hour deletion and no-training rules apply, and they are worth confirming rather than assuming.
Common Receipt Problems and Fixes
A receipt that converts to empty text is usually faded beyond reading, or photographed badly. Try increasing the contrast, re-photographing in brighter light, and flattening the paper. If the text is white on a dark background — some receipts print this way — the result may be inverted; most OCR engines handle it, but a very dark receipt can confuse them, and converting a color-inverted copy can help.
A total that reads wrong is the most common real error. Check whether the total on the receipt is printed in a larger or bolder font than the line items — it usually is — and whether the OCR merged it with the line above or below. If the total is consistently wrong, the cause is often a digit that looks like another character in the receipt's font: "5" and "S", "1" and "l", "0" and "O" are the usual suspects. Compare digit by digit, and fix it by hand.
A date that reads wrong is usually a font problem too, or a date printed as "11/08/26" where the OCR reads the slashes as the number "1". If the date matters — and for expenses it does — check it against the image every time.
A receipt in a language the tool was not set to read will produce strange characters and fragments. Set the language before converting, not after: the language model is loaded at conversion time, and converting again with the right language is the only fix.
The Short Version
Receipts are hard for OCR — small type, faded thermal paper, no standard layout, and content that is mostly numbers and abbreviations. But they are still worth converting, because proofreading an OCR result is faster than typing every line. Photograph the receipt flat, straight down, in bright even light, filling the frame. Check the total first, then the date, then the merchant. Batch your receipts and proofread by confidence, lowest first. Keep the image as the evidence and the text as the working copy, and do not upload receipts to a tool whose privacy policy you have not read.
References
- Internal Revenue Service (IRS), Publication 583 — Starting a Business and Keeping Records: https://www.irs.gov/
- Tesseract OCR, official documentation: https://tesseract-ocr.github.io/
- National Institute of Standards and Technology (NIST), document recognition research: https://www.nist.gov/
- Library of Congress, Digitization and OCR: https://www.loc.gov/
- W3C Web Accessibility Initiative, guidance on text alternatives: https://www.w3.org/WAI/